
Quick Tip – Date & Time Stamp your Reports
Friday, January 29, 2016 - By Jon Gardner
If you run your Jet report regularly over a short period of time it can become very confusing to know quickly which one is the latest. A typical example could be the TB at month end…
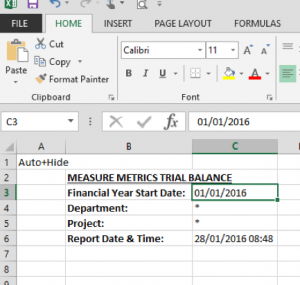
Whilst it is possible to save the date and time in the title of the file name, best practice indicates that such information should be on the report itself – in the top left with all the other report filters.
 Fortunately Jet Reports makes this really easy by providing the =NP(Eval) function which breaks the dynamic link between Excel’s =NOW() function and the computer clock.
Used on its own, the Excel function =NOW() will update the date and time every time any keystrokes are returned in Excel. In the case of printing – it tells you when the report was printed – not when it was actually run.
Jet’s capability to wrap the Excel =NOW() function to break that dynamic link and get a proper date and time means that we can be sure when the information on the report was “good”.
As with all things Excel there is always more than one way of doing things – you can use the =NP() Wizard on the Jet Ribbon Bar (below left), or you can simply key-in the function in the required cell (see address bar, below right)
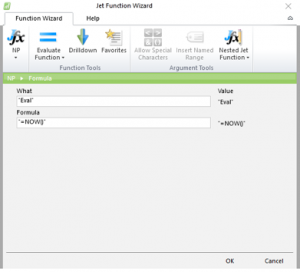

In both cases the =NP(“Eval”,”=NOW()”) function returns a 4-decimal number which can easily be formatted in Excel using the standard – Format Cell > Number > Custom > dd/mm/yyyy hh:mm – option to give the look and feel shown at the top.
In this way you can be sure that the date and time stamp on the report reflects when the report was last updated in Jet Essentials or Jet Enterprise.
Back to blog